Sunday, August 27, 2017

Hand-Coloring Paper with Ken Oliver's Color Burst Watercolor Powders

I've been using spray inks to color background paper for layouts and other projects for years now, but lately I've been having a lot of fun experimenting with the Color Burst Powders from Ken Oliver.  I love that I can get full coverage with smooth blending from one color to the next, and just a little bit of this powder will go a long way.    Here are a few easy techniques you can try yourself:


First I gather up what I'll need and take it into the bathroom.  We have an older bathroom with a large tub near my craft space, so it allows me to be pretty messy with my projects.  I would recommend testing the color on a small, inconspicuous spot before going full blown in your own tub, just to make sure it won't stain.  I've been able to easily wash any color away, usually with just water, but with soap and a scrub brush if it's been sitting for awhile.  You could also use a large plastic tote, bin, or laundry basket, too.  

All I used for this project was some plain white cardstock, the Color Burst Powders, a spray bottle full of water, and I made a "clothesline" with twine and craft clothespins that I strung from the towel bar to the shower head over the tub.

Technique A

Start by wetting the paper.  Then add powder to it.  I like to hold the bottle steady and tap on it with one finger to knock a little bit of powder out at a time.  You can also squeeze the bottle to release a puff of powder.  This will give you more of a spread-out spray/misting of powder, but you don't really know if you're going to get a little or a lot in each squeeze. 

                       
You can see here how the color is pulled out as the powder dissolves into the water.


I like how it looks at this stage, but I decided to keep going and added a second color.  Then I sprayed more water on top.  I probably should have stopped above.  :)


Technique B

This one is basically the opposite order from Technique A.  Here we start with dry paper and add the powders first.  


Then we spray it with water.


At this point you can either stop and carefully set your paper somewhere flat to dry so that the colors don't run, or pick it up by an edge and hang it up so that the colors do run down.  I chose the second option.


Here's the sheet when dry.  I think turned on it's side like this it kind of looks like the ocean.


Technique C

This one starts the same as Technique B with powder on dry paper.  Just put the powder in the center of the paper, and when you spray the water onto it, hold your hand low and to the side so that you're spraying the water on at an angle.  This pushes the dye out toward one side, and as you circle around the center spraying from all sides it will create a burst pattern.


This is one you'll want to dry flat so that the dye doesn't run down and obscure your burst.


Technique D

When you've done a sheet of paper and moved it elsewhere to dry, you will likely have leftover puddles of colored water.  Don't waste them!  One of the funnest and easiest techniques is to lay or dab a clean sheet of paper over them to soak up the color.


You can also let this paper dry and then use it again to soak up a different leftover color.  I did that with these two papers:


Technique E

Another way to use excess ink is to place a clean sheet of paper under the ones that are hanging up to drip dry.  The new paper will catch the drips, and create new patterns.


The distance the paper is from the source of the drip will affect how the pattern turns out.  For the blue paper, I held the new sheet under the dripping paper myself and moved it around to place the dots where I wanted them.  Being close to the source created a much cleaner, polka dot look.  For the green paper, I just set it down on the floor of the tub and occassionally moved it around to catch drips in different spots as I worked on cleaning things up.  The greater distance from the source caused the dye to splash a lot more when it hit the paper.  I then hung this sheet up by one corner to cause the ink to run at a diagonal across the page.


 I love the extra bit of interest a hand-colored background adds to projects versus plain colored cardstock.  They're great backgrounds for scrapbook layouts, ATC's, and cards as well as used in making embellishments and die cuts.  I used two papers I made a couple weeks ago to create a page in a deco book* I was participating in for a swap.  I used the green one as a background paper and the blue to back a die cut.


I have had so much fun experimenting and playing with these colors to make one of a kind papers.  Sometimes they turn out beautiful, sometimes not so much, but I feel like a kid just letting loose and seeing what happens.  Even the papers that aren't so pretty end up transformed when used to back diecuts, make embellishments, or with punches.  I look forward to discovering more ways to use these Color Burst Powders!


* A deco book is a handmade booklet that is passed on from one person to the next, with each person decorating a page in the book according to a theme.  Once it is completed it is either sent back to the original creator or passed on to someone they designate as the final recipient.  It's a fun way to collect artwork from different artists and also to share your own artwork with others.

Friday, February 24, 2017

Shakers Five Ways

Shakers have been popular for years now, but there are so many ways to make one that I thought I’d put together a little list of some of them.  Some are easy, but more expensive, and others are cheap, but take more work.  There is pretty much a method for everyone out there.  

1.  Pre-made forms:  Queen and Co. has created pre-cut adhesive foam shapes called Pop Ups. They come with matching plastic covers and make creating a shaker box pretty easy if you don’t mind spending the money on them.  I made this flower tag using a circle Pop Up, a flower die cut, and some sequins and crystals.       


2.  Foam Tape:  This is a pretty classic way to make a shaker, and it works best with straight-edged shapes like squares and rectangles.  I like to cut my foam tape in half lengthwise to save money, and I usually stack it two layers thick to make sure there is enough room for my fillers to move around between the clear cover and base.  You also want to make sure there are no gaps between pieces of tape where your filler can fall out.  I used a piece of plastic from stamp packaging for the shaker cover on this birthday card.


3.  Stacked paper:  This is the method I’ve used the most.  It’s a bit time consuming, but it’s cheap and you can use it with a variety of shapes.  Using a Silhouette Cameo or other die cutting machine can speed up the process, but you can also hand cut your pieces.  For this ATC I designed a rectangle inside a rectangle in my Silhouette’s design software, then cut a bunch of them out of cardstock along with one cut using just the outer rectangle for the base of my ATC.  I also cut a piece of plastic using just the outer rectangle for the cover.  Once cut, you simply glue together the layers until you have a stack tall enough to cover whatever filler you’re putting inside the shaker, then glue the stacked ring to the background.  Fill the created space with sequins or other tiny bits, cover with the piece of plastic cut to the outer rectangle size, and then cover the plastic with a final ring piece to give it a more finished look.  


My favorite shaker I’ve ever made was done this way.  I cut out the diver’s helmet from Graphic 45’s Voyage Beneath the Sea collection and measured the inner and outer edges of the helmet's window.  I cut rings on my Silhouette to match, and also cut the ring from the G45 image.  After stacking everything and filling with clear crystals, I put the cut G45 ring on top.  I used this for a pocket letter, but someday I want to make another one for myself.


4.  Upcycled packaging: Instead of throwing away molded plastic packaging, use it as a pre-made shaker.  I cut out three rectangles from a package, traced around it on my paper, cut the holes for it to stick through, glued it to the cover paper, filled each rectangle with crystals, then glued the whole card front to the card base.  I’ll admit it took me awhile to get those three holes right (it would be much easier with just a single circle, square, etc.), but it was worth it in the end.


5.  Fuse Tool or Sewing Machine:  Using a Fuse Tool is a great way to make shakers.  I love swapping pocket letters using the 9-pocket storage sheets that people keep baseball cards in.  One of my favorite things to do is turn the center pocket into a shaker by Fusing the top of the pocket closed after filling it.  It also works great for making shakers for cards that are taking a journey through the postal system because they're flatter than traditional shakers, which saves on postage.  Just fuse together two sheets of plastic on three sides, leaving a quarter inch or more of border around the edges.  Fill it up, Fuse it closed, and then glue it between two sheets of cardstock.  If you don't have a Fuse, you can also sew shakers using a machine or by hand.

Recently I did a swap where we made teeny tiny little pocket letters.  You cut out one of the pockets from a 9-pocket sheet protector, then use a Fuse tool or sewing machine to create 9 tiny pockets filled with itty bitty treasures like charms, wood veneers, stickers, flowers, or microbeads.  It's kind of a twist on the usual shaker.


I hope I've given you one or two new ideas for making and using shakers in your projects.  I know this is a fad that's shine is wearing off a little, but they're so fun for both the maker and recipient that I don't think they'll ever completely fade away.  If you have a method to add to this list, please let us know in the comments!  I love to learn how people tweak techniques to make them work for different situations.

Monday, February 15, 2016

Altering Printed Photos


It's the final day of Winter Camp 2016 over at Scrappin' Peeps.  What a fun week(+) of activities it's been!

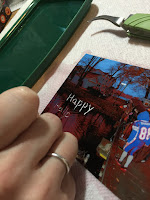
Image altering is pretty prevalent in this day and age of Photoshop and other editing software, but you can also alter photos after they've been printed.  Today I'm going to show you one way to do that, by scratching some of the emulsion off the print.

Photographic emulsion is the coating on the photo paper that actually creates your image when the photo is processed.  When dry, it is fairly hard and won't rub off or scratch easily.  When wet and soft, however, it can be damaged.  We are going to take advantage of this property.


What you'll need:                                                                  

  1. a shallow tray of warm water (I use an old food container lid)
  2. a printed photo (professional and home printed both work)
  3. some scratching tools (I used a paper piercer, some tweezers, and a dry embossing tool.)
  4. paper towels

Step 1.  Immerse your photo in the warm water for 30-60 seconds.  It may start to curl up and expose parts of the photo to air.  Just gently push it back down.  Don't hold it under water, or the part under your finger may not get enough exposure to the water to soften, or you may accidentally scratch an area you don't want scratched.


Step 2.  Remove the photo, shaking excess water off, and lay face up on a paper towel.  (Do not dry off the front of the photo.  Any water remaining on the surface will help the emulsion stay softer longer.)

Step 3.  Choose a tool and begin "drawing" on the surface of the photo, using enough pressure to remove the emulsion layer but not enough to go right through the backing paper.  Note: the sharper your tool, the easier it will be to scratch off the emulsion.  If the emulsion still feels kind of hard and you're having difficulty removing it, soak the photo for another 30 seconds and try again.  Also, if you've been working for a long period of time, you may need to stop and resoak periodically because the emulsion will harden as it dries.  Different tools will produce different results, mainly in the width of the line you are able to scratch.  My paper piercer can make a very fine line, while scraping the end of my tweezers across the paper makes a wider line.

dry embossing tool
paper piercer

tweezers


Step 4.  Gently wipe the emulsion debris off the photo with a paper towel.  If it dries onto the photo, it will be hard to remove without damaging your image.


Step 5.  Set the photo aside to dry.


Now that you know the basics, you can start experimenting.  Try different tools for scratching, like pens, Silhouette or Cricut tools, even sandpaper.  I keep an art journal just for trying out new techniques.  Sometimes I love the results, sometimes, not, but I always learn something.  Here are some examples from my journal of when I played around with this technique in the past:


This is a picture of my kids on one of those airplane amusement park rides.  I scratched away at the background to make it look like the plane was flying on it's own, while still leaving some of the background color showing.  The smaller picture is a close up.


Here I did the same thing, but then colored over it with watercolor pencils.
This one is my favorite.  It's my boys playing on the beach when we went to visit Grandma.  The sandcastle, seashells, sun, and seagulls were all scratched in.  Then I used a "Good Times" rub-on in the corner and matted it on summery patterned paper.